Apache Kafka: A Comprehensive Guide to Real-time Data Streaming and Processing
August 22, 2023

Introduction to Apache Kafka
Apache Kafka is an open-source distributed event streaming platform, originally developed by LinkedIn and later donated to the Apache Software Foundation. It is designed to handle large-scale, real-time data streams and provides a publish-subscribe messaging system that is highly reliable, scalable, and fault-tolerant.
At its core, Kafka allows you to publish and subscribe to streams of records, which can be messages, events, or any kind of data. It is particularly well-suited for scenarios where large amounts of data need to be ingested and processed in real-time, such as log aggregation, monitoring, data warehousing, recommendation engines, fraud detection, and more.
Usage and Benefits of Kafka
Kafka Use Cases
-
1. Real-time Data Streaming:
Kafka allows the ingestion, processing, and delivery of real-time data streams, making it suitable for various data-driven applications.
-
2. Log Aggregation:
Kafka can collect and consolidate log data from various systems, making it easier to analyze and monitor system behavior.
-
3. Metrics Collection:
Kafka can be used to collect and aggregate metrics data from different sources, facilitating performance monitoring.
-
4. Event Sourcing:
Kafka’s event-driven architecture is well-suited for event sourcing patterns, where the state of an application is determined by a sequence of events.
-
5. Stream Processing:
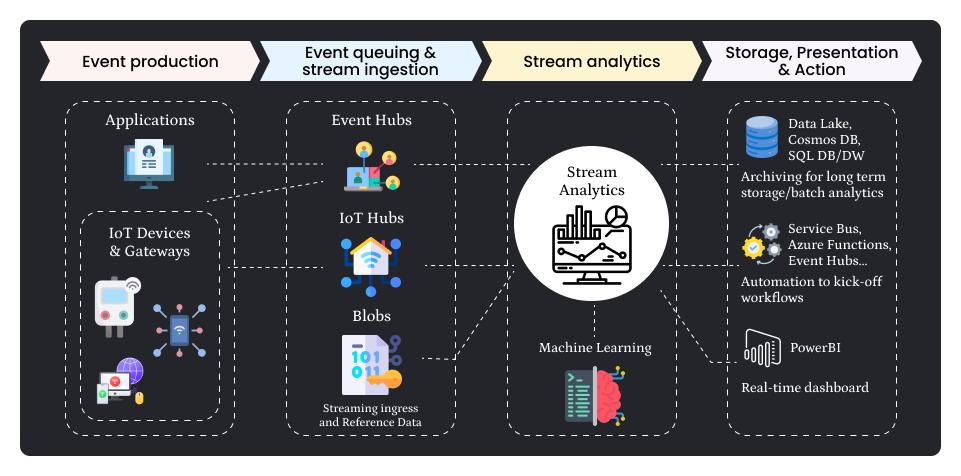
Kafka integrates well with stream processing frameworks like Apache Flink, ApacheSpark, and Kafka Streams, enabling real-time data processing.
Benefits of Kafka
-
1. Scalability:
Kafka is designed to scale horizontally, allowing it to handle an increasing volume of data and traffic.
-
2. Durability:
Kafka stores messages on disk, providing fault tolerance and data durability.
-
3. High Throughput:
Kafka can handle high message throughput, making it suitable for use in dataintensive applications.
-
4. Low Latency:
With its real-time streaming capabilities, Kafka enables low-latency data processing.
-
5. Reliability:
Kafka is designed to be highly reliable and fault-tolerant, ensuring data delivery even in the face of failures.
Kafka Architecture and Fundamental Concepts
Kafka Architecture
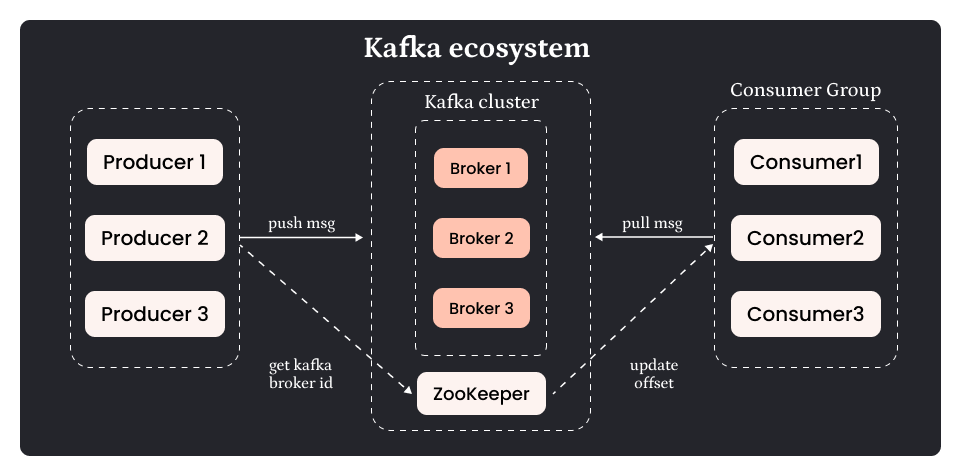
Kafka has a distributed architecture consisting of the following key components:
-
1. Producer:
A producer is a client that sends messages to Kafka topics.
-
2. Broker:
Brokers are the Kafka servers responsible for message storage and serving consumer requests.
-
3. Topic:
A topic is a category or feed name to which messages are published.
-
4. Partition:
Each topic is divided into partitions, allowing data to be distributed across multiple brokers.
-
5. Consumer:
A consumer is a client that reads messages from Kafka topics.
-
5. Consumer Group:
Consumers can be organized into consumer groups, allowing parallel consumption of messages.

Fundamental Concepts
Publish-Subscribe Model
Kafka follows the publish-subscribe messaging model. Producers publish messages to a topic, and consumers subscribe to topics to receive messages.
Message Retention
Kafka retains messages for a configurable period. Once this period elapses, messages are deleted, allowing consumers to control the pace of consumption.
Replication
Kafka allows data replication across multiple brokers to ensure fault tolerance and data availability.
Partitions and Offsets
Each partition in Kafka is an ordered log of messages. Messages within a partition are assigned a unique offset.
Consumer Offset Tracking
Consumers can track their progress in consuming messages through offsets, enabling them to resume from the last processed message after restart.

Implementing Kafka in a Real Project: Step-by-Step Guide
Step 1: Kafka Installation and Setup
1. Download Kafka
Start by downloading Apache Kafka from the official website (https://kafka.apache.org/downloads). Choose the appropriate version for your operating system.
Downloading Kafka on Windows
In this documentation, we’ll guide you through the process of downloading Apache Kafka on a Windows operating system.
Prerequisites
Before you proceed, ensure you have the following:
1. Java: Kafka requires Java to run. Make sure you have Java installed on your system. You can download the latest Java Development Kit (JDK) from the official Oracle website (https://www.oracle.com/java/technologies/javase-downloads.html).
Step 1: Download Kafka
1. Go to the Official Kafka Website: Open your web browser and navigate to the official Kafka website at https://kafka.apache.org/downloads.
2. Choose the Kafka Version: On the Kafka downloads page, you’ll see various versions available for download. Select the latest stable release version suitable for your operating system (Windows in this case).
3. Download the Binary: Under the “Binary downloads” section, click on the link to download theKafka binary. This will initiate the download process.
4. Extract the Archive: Once the download is complete, navigate to the location where the Kafka binary was downloaded (e.g., C:\Users\Downloads). Right-click on the downloaded file and choose “Extract All” to extract the contents.
Step 2: Configure Kafka
1. Set Up Environment Variables: To run Kafka, you need to set up some environment variables. Right-click on “This PC” (or “My Computer”) on your desktop and select “Properties.” Then, click on “Advanced system settings” on the left sidebar. In the System Properties window, click the “Environment Variables” button. Under “System variables,” click “New” to add a new variable.
2. Variable Name: Enter KAFKA_HOME as the variable name.
3. Variable Value: Enter the path to the extracted Kafka directory (e.g., C:\kafka_2.13-3.0.0) as the variable value.
4. Find Java Home: To find your Java Home directory, open a command prompt and type echo %JAVA_HOME%. Copy the path displayed (e.g., C:\Program Files\Java\jdk-17) for the next step.
5. Configure Java Home: In the same “Environment Variables” window, click “New” again to add another variable.
6. Variable Name: Enter JAVA_HOME as the variable name.
7. Variable Value: Paste the path to your Java Home directory that you obtained in the previous step (e.g., C:\Program Files\Java\jdk-17).
8. Update Path Variable: Locate the “Path” variable under “System variables” and click “Edit.” Add the following two entries (if not already present) to the variable value:
9. Save and Apply: Click “OK” to save the changes. Close the “Environment Variables” and “System Properties” windows.
Step 3: Verify Installation
1. Open Command Prompt: Press Windows + R, type cmd, and press Enter to open a command prompt.
2. Navigate to Kafka Directory: Change the directory to the Kafka installation folder by typing the following command and pressing Enter:
Replace C:\kafka_2.13-3.0.0 with the path to your extracted Kafka folder.
3. Start ZooKeeper: To verify that Kafka is working correctly, let’s start ZooKeeper. In the command prompt, run the following command:
If successful, ZooKeeper will start running.
4. Start Kafka Broker: In a new command prompt window (to keep ZooKeeper running), navigate to the Kafka installation folder again. Run the following command to start the Kafka broker:
If successful, Kafka will start running.
Congratulations! You have successfully downloaded and set up Apache Kafka on your Windowssystem.
You can now use Kafka to build salable and distributed Data streaming applications to handle realtime data streams.
Please note that the version numbers and paths mentioned in this documentation may vary based on the version of Kafka you downloaded and your specific setup.
2. Extract the Archive: Once downloaded, extract the Kafka archive to a directory on your machine.
3. Start ZooKeeper: Kafka depends on ZooKeeper for managing the cluster. Open a terminal (or command prompt) and navigate to the Kafka directory. Start ZooKeeper by running the following command:- zookeeper-server-start.bat ..\..\config\zookeeper.properties
4. Start Kafka Brokers: In separate terminal windows, start one or more Kafka brokers with the following commands:- kafka-server-start.bat ..\..\config\server.properties
5. Create Topics: Create the necessary topics that your application will use. For our scenario, we might create a topic named “website_traffic” to handle incoming data. Use the following command to create a topic:-
kafka-topics.bat –create –topic testing-topic –bootstrap-server localhost:9092 – -replication-factor 1 –partitions 3
Step 2: Producer Implementation
In this step, we’ll implement a data producer that captures website traffic data and sends it to the Kafka topic “website_traffic.”
1. Set Up a Producer: In your application code, you’ll need to include the Kafka client library for your programming language (e.g., Java, Python). Initialize a Kafka producer and configure it to connect to the Kafka brokers.
2. Collect Data: Write code to collect website traffic data, such as page views, clicks, or user interactions. You can use tools like Apache Kafka producers to simulate data or integrate with web servers or applications to capture real traffic data.
3. Publish Data: Once you have the data, format it as a Kafka message and publish it to the “website_traffic” topic using the Kafka producer.
-web_activity_producer.py
from confluent_kafka import Consumer, KafkaError
# Kafka broker address
bootstrap_servers = 'localhost:9092'
def consume_messages(topic):
consumer = Consumer({

'bootstrap.servers': bootstrap_servers,

'group.id': 'my_consumer_group',

'auto.offset.reset': 'earliest'

})
consumer.subscribe([topic])
while True:
msg = consumer.poll(1.0)
if msg is None:
continue
if msg.error():
if msg.error().code() == KafkaError._PARTITION_EOF:
print('Reached end of partition')
else:
print(f'Error while consuming: {msg.error()}')
else:
print(f'Received message: {msg.value().decode("utf-8")}')
if __name__ == '__main__':
topic_name = 'testing-topic'
consume_messages(topic_name)
RESULT OF CODE

Step 4: Real-time Analytics & Visualization
In this step, we’ll visualize the real-time analytics using a simple web-based dashboard. For this, we’ll use a WebSocket connection to update the dashboard in real-time as new data arrives.
1. Set Up a WebSocket Server: Implement a WebSocket server in your preferred programming language (e.g., Node.js, Python) to handle connections from the dashboard.
2. WebSocket Connection: Establish a WebSocket connection from the dashboard to the WebSocket server.
3. Receive and Display Data: As new data arrives from the Kafka consumer, send it via the WebSocket connection to the dashboard. Update the dashboard in real-time to display the latest analytics, such as the number of page views, active users, etc.
Step 5: Deploy and Monitor
1. Deployment: Deploy your Kafka cluster, producers, consumers, and dashboard to your production environment.
2. Monitoring: Implement monitoring for your Kafka cluster and application components to ensure the system’s health and performance. Use tools like Apache Kafka Monitor, Prometheus, Grafana, etc.
Step 6: Scaling
As the website traffic and data volume grow, you might need to scale your Kafka cluster and consumers horizontally to handle the increased load. This involves adding more Kafka brokers and consumers as needed.
Conclusion
Kafka’s ability to handle real-time data streams with high scalability, fault tolerance, and low latency makes it a powerful tool for a wide range of use cases. Its publish-subscribe model and distributed architecture make it suitable for various data-driven applications, making it a popular choice among kafka developers and organizations.
Softqube Technologies proudly presents “Apache Kafka: A Comprehensive Guide to Real-time Data Streaming and Processing,” a testament to our commitment to delivering cutting-edge solutions in the realm of data management. At Softqube, we understand the profound impact that real-time data processing holds in shaping the success of businesses today.


