Digital Signage Development on Raspberry Pi
January 20, 2020

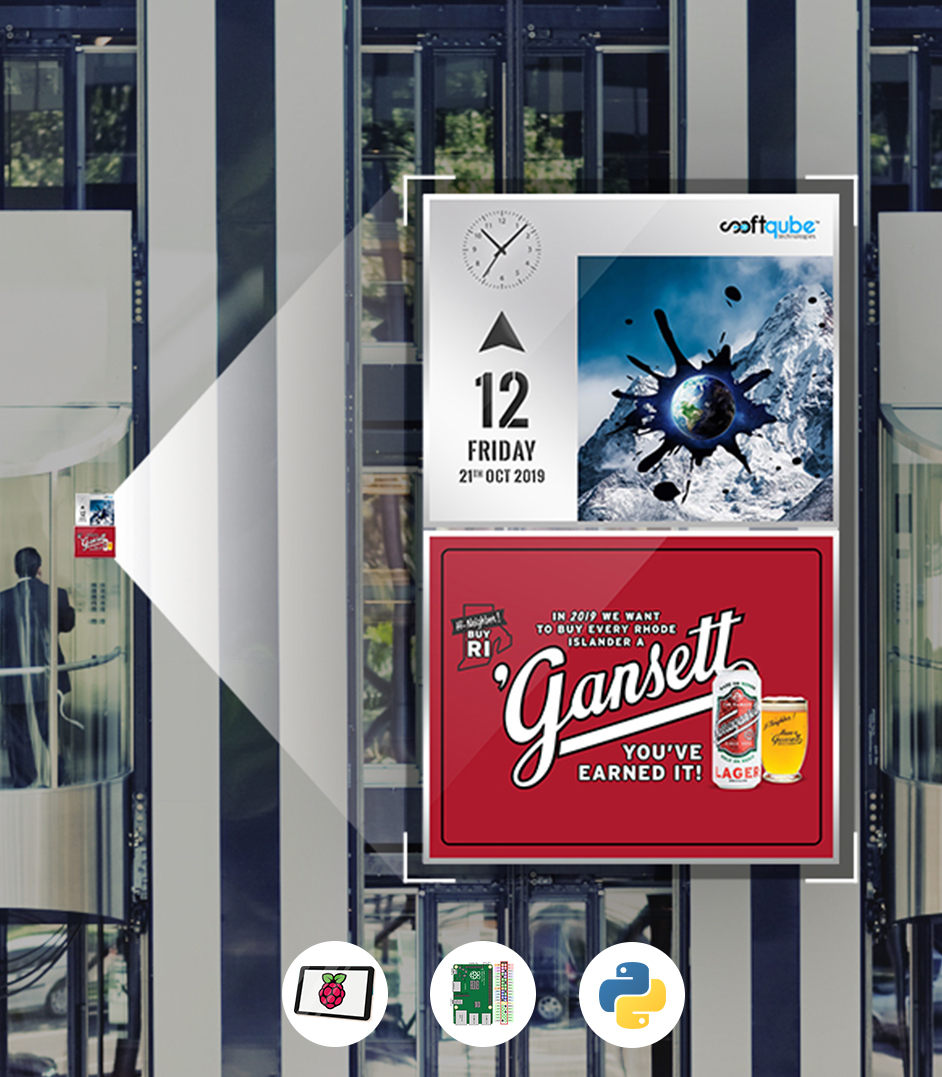
Digital Signage Development on Raspberry Pi for Elevator
- Elevator Digital Display Sparks Elevator Rides with Enriched Experience
What you will learn
- Get deep knowledge about hardware features of the Raspberry Pi 4 and its Application.
- Setup a Digital Signage demo application.
- You learn basic set up the Raspberry Pi 4 and troubleshooting.
- Control GPIO pins and be able to build basic Digital Signage Screen Demo.
Prior knowledge required
- Basic knowledge of input and output device and driver.
- Beginner level knowledge of Python language.
- Basic understanding of electronics.
- Good Logical Thinking.
Raspberry Pi As of today’s era, new technology is growing in the market like mobility and digitalization everywhere. In this growing technological benefit in today’s industry like retail stores, hospitality and government organizations, mall and product showcase and entertainment and health care and production are some of the trending industries to grow the new opportunity in today’s digital signage market.
The evolution of innovative products such as home monitoring system, leak detector systems and so on, Along with the increased adoption of LED and LCD displays in the market, OLED, transparent display, and electronic paper displays (EPD) are expected to exhibit high growth because of the high demand for displays in the digital signage industry. required digitized information management and guidance that can be accessed from remote locations.
As we developed the Digital Signage (Digital Display) for Elevators will help to large building corporations and elevators give best pleasant rides to passengers when they visit the building and as before elevators Leaving light indicators and printed notices in the past, a refreshed appearance in elevators comes by the hands of an upgraded system that immerses users into entertaining rides with useful information.
Elevators in every location will be loaded with useful content that swiftly captivates riders. Connected to the elevator control systems in corporate offices and public buildings, the Vavis elevator digital signage delivers not only standard information such as current floor level, moving direction, or door status, but also safety indicators like overall condition, fire alerts and audible tone to indicate direction and verbal indicator such as “Floor six, going down”, with animation. In elevators of residential buildings, a second screen can be updated becoming a digital bulletin board to announce new or change of services, promotions, notices, and general messages.
Let us consider the benefits of Digital Signage (Digital Display)
- Zero interruptions: In an elevator, electronic signs will have the ability to draw the attention of one and all on board. With the least distractions, people will have adequate time to digest the info on the screen.
- Advertise Businesses within the building: It enables people to know more about the many goings-on found in the building. This will benefit visitors who possibly have their needs met by the business placed in the building.
- Increases value: Digital signage has a greater influence in accelerating the value of the building also. It gives the building management a chance to rise rental charges and lift profits.
- Entertainment: The people going to the uppermost levels might take a number of minutes before arriving there. To make the distance littler for them, the use of the digital display to keep them busy with ads and showbiz.
How its look in the Elevator
Key Technology we used:
- Raspberry Pi 3A+ or 3B module.
- 7” TFT display.
- Raspbian Buster Lite OS with Kernel-Version:4.19.
- 5V power supply for power-up Raspberry Pi.
- Python Language version 3.4.
- PyCharm IDE
 Technology workflow:
- Elevator controller sends data to GPIO of Raspberry Pi
- Raspberry Pi has a program to convert that signal and it shows floor status and a verbal indicator such as “Floor six, going down” on TFT display


What is the Raspberry pi?
- The Raspberry Pi is a low cost($35), a small computer that plugs into a computer monitor or TV, and uses a standard keyboard and mouse. It is a small device that enables you to explore computing and learn how to develop programs in languages like Scratch and Python. It is super easy to use – simply plug in the keyboard, mouse, and monitor, and you’re good to go. Also, it is charged through a USB charger. So, it quickly became obvious that digital signage is definitely in this picture as well, and this very versatile combination was born. For more check on Wikipedia.
Require Tools:
- Hardware
- We required Raspberry Pi with 7” TFT LCD and one Powersupply small Secure Digital card reader and Power Supply.
- Software, Framework and Operating system
Why we used Raspberry Pi?
There are many advantages for the use of Raspberry Pi
-
Cost-Effectiveness
- As previously mentioned, one of the greatest advantages of Raspberry Pi is its price. While the computer itself can be found for around $35, the entire kit with everything you need to use it with digital signage will probably cost you around $60-70. Not bad for small businesses, or big ones that know the value of digital signage, and want to try something far less expensive than the usual deal.
-
Respectable Performance In A Small Package
- While it can really fit in the palm of your hand, it offers amazing performance. ARM Caster HD, for instance, is not only packed with some great, cutting-edge components, allowing for super easy setup and excellent functionality. Its performance is around 10 times better than the previous version. Equipped with a1.2GHz 64-bit quad-core ARM Cortex-A53 CP, it won’t let you down when it comes to the speed of connection or performance of the device itself.
-
Versatility
- As we already mentioned above, you really don’t have to worry about file types at all. Whatever it is that you want to display, whether it’s mp4, jpg or ppt – you’re covered. Just create the best and most engaging content possible, and leave the rest to your new best friend. It is really that easy!
The Possible Downsides
-
Limited Memory
- At this point, there is no way to increase the RAM of Raspberry Pi above 1GB… Also, microSD cards are limiting when it comes to storage. However, technology is advancing really quickly these days, so there’s a huge chance this will change soon, too.
-
Updates
- This depends on the software, but it could happen that you have to manually update each device, which is not that much fun.
-
Possible Lagging
- There have been reports by users of Pi lags when trying to display pages with Java-heavy data. Also, sometimes it is hard for the device to play video, too. That, of course, depends on the device itself, as well as your expectations.
-
Others
- Overheating and freezing of the Raspberry PI
- Unable to play multiple zones of simultaneously playing media
Setup Process
- First of all, you need a good knowledge of the required tools. Download raspbian lite(recommended) Linux based os from this link. After that download balenaetcher from this link. It is an ISO file flashing tool on USB storage devices. Flash downloaded raspbian lite iso file to your SDCard using balenaetcher. Insert SDCard into raspberry pi and plug it with a power supply. Setup a kivy environment on raspberry pi using this link to run kivy UI.

Above is the simple UI example from kivy. Create on <filename>.py file and paste the above code in a file and run. You will get below on the screen. Now the simple UI example is done. Now create UI according to your design.
The Simple Guidelines:
- Don’t run more than one video at a time
- Create up to 3 zones on a layout
- Use videos in MP4 format with H.264
- Play no more than two Flash zones at once
When It Comes To Media Formats, These Are Supported:
- Windows WMV
- MPG4
- H-264
- MOV
- M4v
- Quick Time
- Flash FLV
- MPEG
- SWF
- RSS
- XML
- HTML
- Dynamic Pages
- Jpg
- Gif
- BMP
- MP3
- MediaWMA
- Wav
Where Can We Use Raspberry Pi Digital display?
- It’s good for restaurants, schools, retail, event management, elevators and basically anything you can think of.
Reference Link :
– https://www.raspberrypi.org/downloads/raspbian/
– https://www.jetbrains.com/pycharm/download/
– https://www.python.org/downloads/


